Acoustic wall panels are fitted by preparing a clean, stable wall, marking a level starting line, selecting a suitable fixing method such as adhesive, screws, or battens, installing panels in sequence, and cutting accurately around edges and obstacles to achieve a straight, consistent finish.
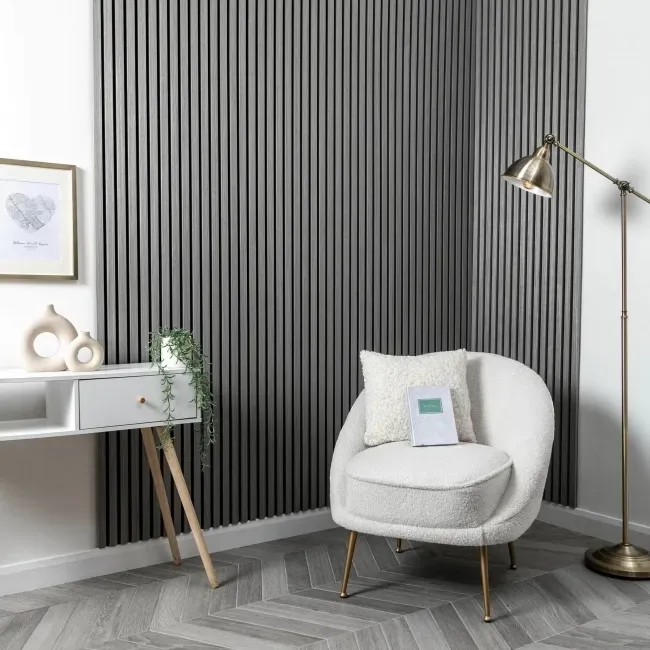
Acoustic panels improve room acoustics by reducing sound reflection from hard surfaces such as plaster, glass, and laminate flooring. Reduced reflection lowers echo and reverberation, which improves speech clarity and overall sound comfort in living rooms, bedrooms, home offices, and media spaces. A correctly fitted panel system also adds structured visual depth through slatted or textured wall finishes.
Installation quality directly affects both appearance and acoustic performance. Incorrect alignment, uneven fixing, or inaccurate cutting around sockets and edges creates visible inconsistencies and reduces the effectiveness of the panel system. A controlled installation process with accurate measuring, stable fixing, and consistent spacing produces a cleaner wall finish and more predictable acoustic results.
Acoustic panels are designed for sound absorption rather than soundproofing. For a detailed comparison, see acoustic panels vs soundproofing. Sound absorption reduces reflected sound within a room, while soundproofing reduces sound transmission through walls and structural elements. This distinction influences both placement and installation method, especially where improved acoustic performance is a priority.
The correct fitting method depends on wall condition, panel construction, and installation goals. Adhesive fixing suits flat, decorative applications on stable surfaces. Screw fixing provides stronger mechanical support on plasterboard and masonry. Batten systems correct uneven walls, create a service void, and support improved acoustic absorption when combined with insulation.
This guide covers the complete installation process, including wall preparation, measuring, layout planning, fixing methods, cutting techniques, obstacle handling, and finishing details. Each stage contributes to achieving a clean, aligned installation with reliable fixing and effective acoustic performance.
Table of Contents
What Is The Best Way To Fit Acoustic Wall Panels?
The best way to fit acoustic wall panels depends on wall condition, panel weight, and installation goals. Adhesive fixing suits flat walls, screw fixing provides stronger support, and batten systems improve alignment and allow performance upgrades.
Three main installation methods are used:
- Adhesive Fixing: Suitable for flat, dry, stable walls. This method creates a clean finish without visible fixings and is often the fastest approach.
- Screw fixing: Provides strong mechanical support and is more reliable on uncertain surfaces. It is also easier to remove or adjust panels later.
- Batten fixing: Creates a framework behind the panels. This method is ideal for uneven walls, allows cable routing, and supports improved acoustic setups.
What Are Acoustic Wall Panels And How Do Acoustic Wall Panels Work?
Acoustic wall panels are surface-mounted panels designed to absorb reflected sound and reduce echo within a room. Most acoustic wall panels improve reverberation control rather than block sound transmission through walls or ceilings.
Acoustic wall panels are usually made from a sound-absorbing core, a decorative face, or a combination of both. In residential interiors, one of the most common forms is the slatted acoustic wall panel: veneered or timber-effect slats fixed to an acoustic felt backing. Sound waves pass between the slats, interact with the absorbent material behind, and lose energy instead of reflecting fully back into the room.
That process helps reduce reverberation and soften the harshness often found in rooms with hard flooring, painted walls, large windows, minimal curtains, and limited upholstered furniture. The result is usually a calmer room response, clearer speech, and a less tiring sound character during conversation, gaming, television use, music playback, and video calls.
Performance depends on more than the visible slat design. Panel thickness matters. Felt density matters. Surface coverage matters. Placement matters. The presence of an air gap behind the panel matters. The use of acoustic insulation behind battens matters. A small decorative wall panel installation on one narrow wall section may make only a modest difference, while a larger fitted area placed where reflections are strongest usually produces a more noticeable improvement.
In practical terms, acoustic wall panels help when the room sounds bright, hollow, fluttery, or overly live. Acoustic wall panels do not work by turning the wall into a dense sound barrier. Acoustic wall panels work by absorbing some of the reflected sound energy already inside the room.

What Should Be Checked Before Fitting Acoustic Wall Panels?
Before fitting acoustic wall panels, check the wall dimensions, surface condition, obstacle positions, wall panel direction, and final edge layout. Accurate planning reduces waste, avoids awkward finishing cuts, and improves alignment across the full installation.
Preparation determines whether the job feels controlled or difficult. Many visible installation faults are created before the first cut is made. A careful checking stage reveals surface issues, measuring errors, fixing limitations, and layout problems that would otherwise appear halfway through the installation.
The most important checks include the following:
- Measure the wall in multiple places. Record the width at the top, middle, and bottom. Record the height at the left, centre, and right. Internal walls are often slightly out of square, and those small differences become obvious when full-height panels meet the ceiling, skirting, or corner.
- Assess the wall honestly. A dry, stable, reasonably flat wall gives the best result. Loose plaster, flaking paint, textured finishes, damp patches, cracked skim, and old wallpaper edges all reduce fixing reliability and can create alignment issues.
- Mark every obstacle early. Plug sockets, switches, media outlets, thermostat boxes, wall lights, radiators, pipe runs, skirting details, and door linings all affect the layout. An installation becomes much easier when all penetrations and interruptions are planned before the first panel is fixed.
- Decide on panel orientation in advance. Vertical slats usually make a wall feel taller and are the most common arrangement. Horizontal fitting can widen the look of the room, but often creates different joint and cut-out challenges.
- Check the final panel width before starting. A layout that finishes with a very narrow strip at one edge usually looks accidental. Adjusting the starting point early often creates a more balanced finish at both ends of the wall.
Good preparation saves time, reduces breakage, lowers waste, and improves finish quality. Most fitting problems that seem technical later are actually planning problems that started earlier.
Before installing, check out our complete guide to acoustic wall panels to understand types, materials, and where they work best.
Which Tools And Materials Are Needed To Fit Acoustic Wall Panels?
Acoustic wall panel installation usually requires measuring tools, levelling tools, cutting equipment, fixings, and wall preparation materials. Batten-mounted installations also require timber battens, suitable screws and plugs, and optional acoustic insulation.
Tool quality has a direct effect on installation accuracy. Inaccurate marking tools create poor cuts. Weak or unsuitable blades create chipped edges. Poor levelling tools lead to drifting lines and visible misalignment. The exact toolkit varies with the chosen installation method, but most homeowners need a dependable core set of items before the job begins.
The main tools and materials include the following:
- Tape measure and steel rule. These are used for wall dimensions, cut marking, obstacle set-out, and edge checking. A rigid steel rule improves control on shorter marked cuts across felt backing and slat faces.
- Pencil and marking square. Clear lines reduce mistakes. A square helps maintain true ninety-degree cuts, which is especially important where several wall panels need to join cleanly.
- Spirit level or laser level. The first panel controls the entire wall, so the reference line needs to be accurate. A reliable level also helps confirm plumb on vertical installations and horizontal consistency on wide feature walls.
- Saw suited to the panel material. A fine-tooth hand saw, circular saw, track saw, jigsaw, or oscillating tool may be appropriate depending on the cut type. Fine-tooth blades generally improve finish quality and reduce splintering on decorative slats.
- Drill and suitable bits. Screw-fixed and batten-mounted systems require accurate drilling. Masonry needs the correct masonry bit and plugs. Timber battens need timber fixings sized correctly for both the batten and the wall substrate.
- Grab adhesive or panel adhesive. Adhesive should be chosen to suit the wall panel backing and the wall surface. Not all adhesives perform equally on felt-backed panels, sealed plaster, plasterboard, or textured finishes.
- Screws and wall plugs. Mechanical fixing depends on using the correct screw length, diameter, and plug size for the substrate. Masonry, blockwork, plasterboard, and timber studs all require different fixing logic.
- Timber battens. Straight battens are essential. Twisted or bowed battens transfer visible irregularity into the panel face.
- Acoustic mineral wool or similar absorbent insulation. This is used within the cavity behind battens where improved sound absorption is part of the goal.
- Filler, sandpaper, cleaning cloths, vacuum, and dust sheets. Surface preparation is easy to underestimate, but dust and loose debris reduce bond quality and compromise marking accuracy.
Higher-quality tools reduce the risk of visible mistakes. A homeowner fitting a full-height feature wall usually benefits from investing in accurate cutting and levelling equipment, even where the rest of the installation remains straightforward.
Which Wall Types Are Suitable For Acoustic Panels?
Acoustic wall panels can be fitted to plastered walls, plasterboard, stud walls, masonry, and blockwork when the surface is stable and the fixing method suits the substrate. Unsuitable surfaces usually fail because of poor adhesion, weak screw retention, or visible unevenness.
Most internal wall types can support acoustic wall panels, but suitability depends on condition as much as material. A flat, dry plastered wall may accept adhesive well. A damaged plastered wall with weak paint adhesion may not. A plasterboard wall can support panels reliably when fixings locate into studs or use appropriate support. A plasterboard wall can also fail if heavy panels are attached without proper load planning.
The most common wall conditions behave as follows:
- Plastered masonry walls: Often suit adhesive, screw fixing, or battens. A sound plaster surface with limited texture usually gives good contact for direct fixing. Weak plaster or friable skim often benefits from mechanical fixing or a batten build-up.
- Plasterboard walls: Can support acoustic panels well, but the fixing method matters. Adhesive works best on flat, stable plasterboard. Screw fixing is strongest when studs can be found. In other cases, specialist cavity fixings may be needed, depending on weight and layout.
- Masonry and block walls: Usually suit screws with correct plugs and suit batten frameworks very well. Direct adhesive fixing is also possible when the finished face is flat, clean, and sealed enough for good bond performance.
- Older uneven walls: Often benefit most from battens. The framework allows the installer to correct the face of the wall and create a straighter visual plane for the finished panel system.
- Wallpapered or tiled walls: Are higher-risk surfaces. Wallpaper can fail under load because the wallpaper bond is weaker than the adhesive bond. Tiles can introduce adhesion uncertainty unless the surface and adhesive system are known to be suitable.
The right question is not simply whether acoustic panels can be fitted to a wall type. The right question is whether the wall, in its current condition, is flat enough, sound enough, and dry enough for the chosen method.

How Should A Wall Be Prepared Before Panel Installation?
A wall should be clean, dry, stable, and as flat as practical before acoustic wall panel installation. Proper surface preparation improves fixing strength, reduces movement, and lowers the risk of visible gaps or misalignment.
Surface preparation is often overlooked because the wall will sit behind the panels when the job is finished. That assumption creates avoidable failures. Adhesive relies on the wall surface. Screws rely on the wall surface. Battens also rely on a stable base. A poor substrate remains a poor substrate after the decorative face has been fitted over it.
The preparation process should include the following:
- Remove dust, grease, and loose material. Dust weakens adhesive contact. Grease reduces bond quality. Loose paint, weak filler, and failing wallpaper edges can separate from the wall under load.
- Check for damp or unresolved moisture issues. Acoustic wall panels should not be fixed over an active damp problem. Trapped moisture can damage finishes, reduce bond strength, and create longer-term wall condition issues.
- Fill larger holes and correct severe surface damage. Minor imperfections are often acceptable. Deeper hollows, broken plaster corners, and pronounced dips can create rocking, weak support zones, or visible face distortion.
- Reduce raised texture where needed. Heavy texture reduces contact area, especially on adhesive-fixed installations.
- Identify hidden services before drilling. Cable runs and pipe routes need to be considered before any screw fixing or batten installation begins, especially on media walls and modern refurbished interiors.
- Prime very porous surfaces where required. Some walls absorb adhesive too quickly, weakening the intended bond. Where the adhesive manufacturer recommends sealing or priming, that guidance should be followed.
A properly prepared wall usually shortens the installation itself because the panels sit flatter, the fixing behaves more predictably, and fewer last-minute corrections are needed.
Should Acoustic Wall Panels Be Fitted Vertically Or Horizontally?
Acoustic wall panels can be fitted vertically or horizontally, but the best direction depends on room proportions, visual style, obstacle positions, and the way the panel system is designed. Vertical fitting is more common because it usually creates a cleaner, taller-looking finish.
Orientation affects both aesthetics and practical fitting. Vertical slats are the standard choice for many residential panel systems because the design is manufactured with that look in mind. Vertical installation also makes it easier to create a full-height wall treatment and often simplifies alignment where the panels are being cut to the room height.
Horizontal fitting can work well on wide walls, behind beds, across lower feature sections, or in rooms where the design needs to feel broader and calmer. Horizontal slats can visually widen a narrow wall and reduce the emphasis on ceiling height. However, horizontal layouts often create different joint positions, more visible seams on larger walls, and more complex cut-out conditions around sockets, switches, and media points because the slat lines cross those elements differently.
The direction should be chosen based on four practical criteria:
- The proportions of the room
- The shape and width of the wall
- The position of fixed obstacles and services
- The way the panel system is meant to be cut and joined
A quick scaled sketch or floor test can help avoid layout regret later. Strong panel installations rarely look successful by chance. They usually look successful because the orientation was chosen deliberately.
How Do You Measure A Wall For Acoustic Wall Panels?
To measure a wall for acoustic wall panels, record the width and height in multiple places, note every obstacle position, and compare the wall dimensions with the actual panel size before deciding the layout. Multi-point measuring prevents cutting errors caused by out-of-square walls.
Accurate measuring is the basis of accurate fitting. Many homeowners take one width and one height, then discover during installation that the ceiling line drifts, the skirting rises, or the wall narrows slightly toward one corner. Those small differences create obvious problems when panel slats form strong visual lines from floor to ceiling.
A dependable measuring routine includes the following:
- Measure width at the top, centre, and bottom
- Measure height at the left, centre, and right
- Note the position of sockets, switches, media outlets, vents, and trims
- Record skirting height, ceiling detail, coving projection, and any door or window lining interference
- Compare the total wall size against the real manufactured size of the panels
- Check where joints will fall across the wall
- Confirm whether the final cut piece at each edge will look visually balanced
Sockets and switches should be measured from fixed reference points, usually one side edge and the floor or top of the skirting. Those measurements should be checked twice before cutting because even a small inaccuracy becomes obvious on a slatted panel.
Measuring also affects ordering. A project ordered too tightly can stall if one cut goes wrong or one panel is damaged in handling. A sensible waste allowance is usually worth including, especially where the wall contains several interruptions or awkward details.
How Do You Plan The Panel Layout Before Fixing Starts?
A good panel layout starts from the strongest visual reference, balances the finish across the wall, and avoids leaving a narrow final strip. Careful layout planning improves symmetry, reduces waste, and makes the finished wall look intentional rather than improvised.
Layout planning is not only about fitting enough material onto the wall. Layout planning decides where the eye will notice mistakes. A panel wall behind a sofa, bed, television, or desk naturally draws attention to the slat rhythm, panel joints, and boundary lines. A rushed layout often leads to one thin strip at the edge, a joint in the wrong place, or an awkward cut-out that interrupts the pattern more than necessary.
The layout stage should cover the following points:
- Choose the visual starting point carefully. Starting from one corner often works on simple walls. On a centred media wall or bed wall, a more balanced starting point may create the stronger result.
- Check where joints will land. Wide walls usually require more than one full panel. Joint placement should look deliberate and should not clash awkwardly with sockets, furniture centres, or architectural features.
- Balance edge cuts. Two moderate cuts usually look better than one full-width panel at one side and one very narrow strip at the other.
- Work obstacles into the pattern. Sockets, switches, cable exits, and thermostat boxes should be set out in relation to the slat rhythm where possible, not treated as last-minute interruptions.
- Confirm grain and finish direction. Some panels have a directional decorative surface. Visual consistency matters across the full installation.
Where space allows, a dry layout on the floor can help confirm the visual rhythm before any permanent fixing begins. That extra step is especially useful on larger or more visible feature walls.
How Do You Fit Acoustic Wall Panels With Adhesive?
To fit acoustic wall panels with adhesive, prepare the wall, mark a straight starting line, apply suitable adhesive evenly to the panel backing, press the panel into place, and check alignment immediately. Adhesive fixing works best on flat, clean, dry, stable surfaces.
Adhesive installation looks simple, but the method is only as reliable as the substrate beneath it. Once a large panel touches the wall, the adjustment window may be limited, depending on the adhesive and the surface condition. For that reason, dry positioning, careful handling, and accurate marking matter as much as the adhesive itself.
A reliable adhesive installation process usually includes the following:
- Prepare the wall thoroughly. Dust, grease, loose paint, and damp areas should be addressed before adhesive is opened.
- Mark the first panel position with a level. A small error at the start becomes obvious by the far edge of the wall.
- Apply adhesive in a suitable pattern and quantity. Too little adhesive reduces support. Uneven coverage can leave hollow areas behind the panel.
- Lift and position the panel carefully. Full-height acoustic panels are often easier and safer to handle with two people.
- Press firmly and evenly across the backing. Pressure should seat the panel properly without distorting the visible slat face.
- Recheck level, plumb, and edge alignment at once. Correction is far easier before the adhesive begins to take hold.
Adhesive-only installation is usually best on sound, flat walls in dry internal rooms. The method is less suitable where the wall is uneven, the existing finish is unreliable, or future removal is likely.

How Do You Fit Acoustic Wall Panels With Screws?
To fit acoustic wall panels with screws, mark the fixing positions, align the panel to a true reference line, drill where necessary, and secure the panel using fixings suited to the wall type. Screw fixing gives stronger long-term support and usually makes later removal easier.
Screw fixing is often the more robust choice when wall conditions are uncertain, panel weight is higher, or stronger long-term support is needed. The method also gives more control during installation because the panel can be adjusted and secured in stages rather than relying on immediate adhesive grab.
A typical screw-fixed installation includes the following:
- Set a true starting line. As with adhesive installation, the first line dictates the whole wall.
- Match the fixing strategy to the substrate. Masonry requires plugs. Timber stud walls require accurate stud location. Plasterboard-only situations require an appropriate fixing approach based on weight and support.
- Choose discreet and consistent screw positions. Some systems allow screws through the felt backing where the fixings are visually less intrusive. Random screw placement weakens the finish and can look careless.
- Pre-drill where needed. Pre-drilling can improve accuracy and reduce the chance of splitting or breakout on some panel designs.
- Tighten securely without crushing the panel. Over-tightening can distort the backing and leave visible pressure marks.
- Check each panel for flush seating and edge alignment before moving to the next. Minor drift becomes obvious quickly across multiple panels.
Screw fixing often suits larger walls, older substrates, high-traffic areas, rental properties, and installations where future service access or replacement may be required.

Do Acoustic Wall Panels Need Battens?
Acoustic wall panels do not always need battens, but battens can improve wall straightness, service access, and acoustic performance. A batten system is especially useful on uneven walls or in installations where an air gap and insulation are part of the design.
A batten framework adds time, materials, and wall build-up, but it also adds flexibility and control. Battens create a straighter base on imperfect walls, provide a secure framework for the panels, and form a cavity behind the acoustic surface. That cavity can be left open or filled partly with absorbent insulation depending on the acoustic goal.
Battens are especially useful in the following situations:
- The existing wall is uneven. Battens can be packed and adjusted to create a truer finished face than direct-to-wall fixing would allow.
- Acoustic improvement matters as much as appearance. The cavity behind the panels improves absorption, especially when paired with mineral wool.
- Cables need to run behind the wall treatment. Media walls, workstations, and entertainment setups often benefit from a service void.
- Future access or reversibility matters. Panels fixed to battens can sometimes be removed and refitted more practically than fully bonded adhesive installations.
Battens do increase labour, projection, and material cost. On a small decorative wall with a flat substrate, that extra structure may be unnecessary. On an uneven wall or a performance-led installation, battens often provide the better solution.
How Do Battens And Insulation Improve Acoustic Wall Panel Performance?
Battens improve acoustic wall panel performance by creating an air cavity behind the panel, and insulation improves performance further by absorbing more sound energy within that cavity. This build-up usually performs better than direct-to-wall fixing alone.
When acoustic panels are fixed directly to a hard wall, the absorbent backing still works, but the panel sits close to a reflective surface. Adding battens creates space behind the panel. That space allows sound to interact more effectively with the absorbent structure. Adding mineral wool or similar acoustic insulation within the cavity increases that effect by giving reflected sound more material to dissipate into.
This upgraded build-up is especially useful in the following environments:
- Home offices where speech clarity matters
- Media walls where speaker reflections can sound bright or hard
- Gaming rooms and content-creation spaces
- Open-plan rooms with hard flooring and limited soft furnishings
- Bedrooms where a softer, calmer acoustic character is desired
The exact improvement depends on cavity depth, insulation type, treated area, room size, panel design, and the rest of the room furnishings. A single feature wall with battens and insulation is not equivalent to a full studio acoustic treatment, but the difference compared with direct fixing can still be noticeable in everyday domestic use.
Homeowners focused mainly on appearance may not need that extra build-up. Homeowners focused on better room acoustics should consider it seriously before choosing the quickest installation route.
How Do You Fit Acoustic Wall Panels Step By Step?
To fit acoustic wall panels step by step, prepare the wall, mark the starting line, test the first panel position, fix the first panel securely, add the remaining panels in sequence, and finish the final edges neatly. The first panel and the last cut usually determine most of the visual quality.
A clear sequence prevents avoidable errors. The process below works for most decorative acoustic panel systems, whether the chosen method is adhesive, screws, or battens.
Step 1: Prepare the wall and organise the work area
A clean work area and a properly prepared wall reduce delays, improve accuracy, and lower the chance of handling damage. Installation becomes harder when dust, offcuts, packaging, and missing tools are left unmanaged.
Bring the panels into the room in advance where appropriate so the materials can settle to room conditions. Protect the floor where cutting and positioning will take place. Set out tools in the order they will be used. Confirm that every screw, plug, adhesive tube, saw blade, and drill bit is available before any panel is cut.
Step 2: Mark the first reference line
The first reference line must be straight because every panel will follow it. A minor error at the start becomes much more obvious as the installation moves across the wall.
Use a spirit level or laser to create the main guide. Check it again before fixing begins. Corners, door frames, and skirting boards should never be assumed to be straight enough on their own.
Step 3: Dry-fit the first panel
A dry test fit confirms clearances, reveals obstacle issues, and reduces the risk of immediate fixing mistakes. This step is especially useful with tall panels, uneven floors, and nearby sockets or trims.
Position the first panel without permanent fixing. Check the top, bottom, side edge, and general slat alignment. Confirm that the visual line works with the edge of the wall and any nearby furniture or architectural features.
Step 4: Fix the first panel
The first panel should be fixed only after its position has been fully checked. The first panel acts as the control panel for the entire installation.
Whether using adhesive or screws, fix the panel carefully and confirm that the face remains flat. Do not rush to the second panel until the first panel is unquestionably true.
Step 5: Add adjacent panels and maintain alignment
Each new panel should be checked against both the wall reference and the previous panel. Consistency matters more than speed once the installation is under way.
Continue one panel at a time. Watch the slat spacing, the joint line, and the face level. Remove dust from cut edges before final placement. Repeat alignment checks frequently rather than waiting until several panels are already fixed.
Step 6: Cut and fit the final sections
Final edge pieces need careful measuring because small errors stand out against corners, ceilings, skirting boards, and trims. The last panel should look planned rather than squeezed into the remaining gap.
Measure the finishing space in more than one place where the wall is out of square. Transfer the measurement carefully. Cut slightly oversize only when trimming back is practical. The final edge should look intentional and clean.
How Do You Cut Acoustic Wall Panels Accurately?
Acoustic wall panels are cut most accurately with careful marking, stable support, and a fine-tooth blade suited to the panel material. Clean cutting protects the slat finish, reduces felt tearing, and improves the quality of joints and edge details.
Cutting is often the point where DIY panel installations lose quality. A rough cut can chip the visible finish, weaken the felt backing, and leave an obvious gap at the wall edge or around a socket. The best cutting method depends on the panel type and on whether the cut is a cross-cut, rip cut, or obstacle cut-out.
The core cutting principles are straightforward:
- Support the panel fully. A long panel that flexes during cutting is harder to control and more likely to tear or chip.
- Mark clearly and accurately. Sharp, visible lines improve confidence and reduce wandering during the cut.
- Choose the correct blade. Fine-tooth blades generally leave a cleaner finish on veneered slats and decorative surfaces.
- Cut steadily rather than forcing the tool. Aggressive cutting usually increases splintering and felt damage.
- Recheck the measurement before starting the cut. Acoustic panels are expensive enough that one rushed mistake can cost more than the time saved.
Cross-cuts are common when reducing panel height. Rip cuts are usually needed at final edges or around awkward reveals. A jigsaw or oscillating tool may be useful for internal openings and shaped cut-outs, but the chosen tool should always suit the visible finish requirement.

How Do You Cut Acoustic Wall Panels Around Sockets, Switches, And Other Obstacles?
To cut acoustic wall panels around sockets, switches, and similar obstacles, measure from fixed reference points, transfer the dimensions carefully, mark the opening clearly, and cut before fixing the panel. Accurate cut-outs reduce visible gaps and improve the finished look.
Obstacle cutting is where careful installations separate themselves from rushed ones. The most common mistake is measuring from the wrong reference point or forgetting that the visible face plate may not line up exactly with the back box in the way expected. A small error in one socket cut-out can force a complete panel replacement.
A reliable obstacle-cutting process usually includes the following:
- Measure from the nearest fixed vertical edge to the obstacle
- Measure from a fixed horizontal reference, usually the floor or top of the skirting
- Record the full width and height of the opening
- Allow for the visible face plate and the clearance needed
- Transfer the shape carefully to the panel
- Dry-check the panel against the wall before final fixing whenever possible
The same discipline applies to pipe penetrations, thermostat boxes, wall lights, television cable exits, radiator brackets, and grouped service points. When several services sit close together, making a simple cardboard template can reduce risk before the actual panel is cut.
The cleanest installations are rarely the fastest. They are usually the installations where every obstacle was measured twice, marked clearly, and checked before cutting.
How Do You Fit Acoustic Wall Panels Around Corners, Skirting Boards, Ceilings, And Door Edges?
Panels around corners, skirting boards, ceilings, and door edges should be measured to the actual finished boundary, cut accurately, and installed with a clear edge strategy. Neat perimeter detailing improves the whole wall because edge faults are immediately visible.
Perimeter details do a great deal of visual work. Slatted acoustic wall panels create strong lines, so irregular gaps at edges attract attention quickly. A central field of panels can look excellent, yet the overall impression still falls if the corners, top line, or skirting junctions are uneven.
The main perimeter conditions should be handled as follows:
- Internal corners should be checked for squareness before measuring. Very few corners are perfectly true, so the panel may need to be measured in more than one place.
- External corners need extra care because the cut edge is more exposed. In some installations, a trim or returned detail creates a stronger finish than an exposed cut.
- Skirting boards create an early design decision. Panels can stop above the skirting, be cut to follow the skirting profile, or be installed after skirting removal in some renovation schemes.
- Ceilings and coving often vary more than expected. Measuring in only one place can leave a visible tapering gap.
- Door linings and window reveals need enough clearance for a neat edge without leaving the panel looking trapped or badly pinched.
A strong perimeter strategy should be decided before installation begins, not improvised at the final stage.
What Common Mistakes Should Be Avoided When Fitting Acoustic Wall Panels?
Common acoustic wall panel fitting mistakes include inaccurate measuring, an unlevel first panel, unsuitable fixings, rough cutting, poor obstacle planning, and unrealistic acoustic expectations. Most visible failures begin during preparation rather than during final fixing.
Panel fitting mistakes are predictable, which means they are usually avoidable. Most of them fall into a small number of practical categories.
- Measuring the wall too casually. One width and one height are rarely enough on a real internal wall. Out-of-square conditions then show up as poor edge cuts and drifting slat lines.
- Using an unreliable starting point. Corners, skirting boards, and older door frames are often not true enough to guide the whole installation.
- Choosing the wrong fixing method. Adhesive on a weak surface or under-specified screws in an unsuitable substrate often fail later.
- Ignoring wall condition. Dust, damp, loose paint, cracked skim, and poor surface preparation undermine the whole system.
- Rushing cut-outs. Socket and switch openings are highly visible and unforgiving.
- Failing to plan the final edge width. Thin finishing strips almost always reduce the visual quality of the wall.
- Expecting soundproofing from a decorative acoustic feature. Disappointment often comes from the wrong expectation, not from the wrong installation.
Avoiding these mistakes is usually less about advanced craftsmanship and more about disciplined sequencing, patience, and accurate checking at each stage.
Can A Beginner Fit Acoustic Wall Panels Successfully?
A beginner can fit acoustic wall panels successfully when the wall is straightforward, the panel system is manageable, and the installation is planned carefully. Beginners usually struggle more with measuring, cutting, and layout decisions than with the act of fixing itself.
A first-time installer does not need specialist trade experience to complete a simple panel wall to a good standard. A flat bedroom feature wall with few interruptions is very different from a media wall with multiple services, hidden cables, uneven plaster, and strict alignment demands.
A beginner is usually in a strong position to succeed when:
- The wall is flat, dry, and stable
- The layout is simple
- Few sockets or switches interrupt the installation
- The panels are not especially heavy
- The chosen fixing method is fully understood before starting
- Accurate cutting and levelling tools are available
A beginner should think seriously about professional help when:
- The wall is badly uneven
- Hidden cables or services are uncertain
- The room contains many cut-outs, corners, or trims
- The panel system is expensive enough that mistakes would be costly
- The finish standard needs to be especially high in a prominent room
- A batten system with service integration is part of the design
In this type of project, patience often matters more than speed. A careful beginner who measures accurately and works methodically can achieve a better result than a rushed installer with more confidence than discipline.

When Should Professional Help Be Used For Acoustic Wall Panel Installation?
Professional help is worth using when the wall condition is poor, the layout is complex, hidden services are uncertain, or the finish standard is high. Professional installation is also sensible where battens, insulation, integrated lighting, or precise acoustic detailing are involved.
Not every wall panel project requires specialist fitting, but some clearly benefit from it. A premium living room feature wall with integrated lighting, hidden media cables, deep socket extensions, uneven plaster correction, and minimal tolerance for visible defects demands more than basic DIY confidence.
Professional input is particularly useful in the following cases:
- Large full-height walls in highly visible spaces
- Uneven, damaged, or unreliable substrates
- Installations involving battens, insulation, or service voids
- Media walls with grouped penetrations and concealed cabling
- Homes where drilling could disturb unknown services
- Projects where wasted material would be costly
- Rooms where the visual standard needs to match bespoke joinery or fitted furniture
A capable installer brings more than speed. A capable installer understands sequencing, face correction, edge treatment, service routing, and how to adapt when the wall is not as straight as expected. In that sense, professional help is often a form of risk control as well as a labour decision.
How Long Does It Take To Fit Acoustic Wall Panels?
Acoustic wall panel installation can take a few hours on a simple small wall or one or more days on a larger and more complex feature wall. Timing depends on wall preparation, cutting complexity, fixing method, and the number of obstacles.
Project length is often underestimated because the difficult part is not always the visible fixing stage. Measuring, planning, dry-checking, surface preparation, cut-outs, and final finishing can take as much time as the actual attachment of the panels.
The main time factors include:
- Surface preparation requirements
- Layout planning time
- Number of panels and joints
- Number and type of cut-outs
- Whether battens and insulation are being used
- Whether one person or two people are handling the panels
- Whether the room needs protection, clearing, and reinstatement after the work
A clean, flat wall with no sockets and a direct adhesive method can move quickly. A media wall with battens, grouped service points, and full-height detailing takes much longer. A realistic schedule should always include measuring time, checking time, cutting time, and clean-up time.
How Should Acoustic Wall Panels Be Maintained After Installation?
Acoustic wall panels should be maintained with gentle dust removal, periodic fixing checks, and early attention to any impact damage or edge movement. Good maintenance preserves appearance and helps the installation remain secure over time.
Maintenance is usually simple, but acoustic wall panels do benefit from routine care because the slatted surface and felt backing can collect dust more visibly than a painted wall. The maintenance approach should suit the finish of the panel and the environment in which the wall is installed.
A sensible maintenance routine includes the following:
- Remove dust gently. A soft cloth, soft brush, or vacuum with a brush attachment usually works well. Regular light cleaning is better than infrequent aggressive cleaning.
- Inspect edges and joints. Small areas of lifting or movement should be addressed early before they develop into a broader fixing issue.
- Check for impact damage. Hallways, media walls, and rooms where furniture is moved frequently are more exposed to knocks and scrapes.
- Manage room moisture. Most standard decorative acoustic panels are intended for dry internal conditions and should not be exposed to persistent damp or heavy condensation.
- Protect the installation during nearby decorating work. Paint splashes, abrasive cleaning, and careless masking can damage both the decorative slats and the acoustic backing.
Routine care is low effort compared with the installation itself, but regular attention helps preserve both finish quality and service life.
What Environmental Considerations Matter When Fitting Acoustic Wall Panels?
Environmental considerations include panel material sourcing, waste reduction, indoor air quality, durability, and the amount of corrective work needed during installation. A carefully planned project reduces offcut waste and supports a longer product life.
Environmental performance in a wall panel installation is not limited to whether the slats are wood-based. The fitting process itself also affects waste, replacement rate, adhesive use, and long-term durability. Poor measuring creates offcuts. Rough cutting creates waste. Poor preparation can shorten the life of the installation and increase the chance of early replacement.
The most relevant environmental factors include the following:
- Material selection. Panels made with responsibly sourced wood components or recycled acoustic backing can offer a stronger overall profile than short-life alternatives.
- Waste reduction. Accurate measuring and better layout planning reduce failed cuts and unnecessary offcuts.
- Durability. A long-lasting installation is usually more resource-efficient than one that needs replacing early.
- Indoor air quality. Low-odour, appropriate adhesives are especially important in bedrooms, living rooms, and home offices.
- Repairability. Systems that allow partial replacement or controlled removal can reduce material waste over time.
A more sustainable project is often the one that was measured correctly, cut carefully, and fitted to last rather than rushed into place.
Where Should Acoustic Wall Panels Be Placed For The Best Result In A Room?
Acoustic wall panels work best where sound reflections are strongest and where hard surfaces dominate the room response. Large bare wall areas near seating, desks, televisions, and speaking positions usually deliver the most noticeable improvement.
Placement matters because acoustic performance depends on location as well as product. The same wall panel can feel far more effective in one part of the room than another. A wall near a desk, opposite glass, behind a television, or beside a speaking position will often influence the room sound more noticeably than a decorative installation placed only for symmetry.
Common high-value locations include the following:
- Behind or beside a desk in a home office. This area often improves speech clarity and reduces harsh reflections during calls.
- Behind a television or media unit. The wall can contribute both acoustic control and a strong visual focal point.
- On a large bedroom wall with limited soft furnishings. Bedrooms with laminate flooring and plain painted walls often sound brighter than expected.
- In hallways and transitional spaces. Parallel hard surfaces make hallways especially reflective.
- In content-creation, gaming, or music rooms. Even moderate treatment can improve the sense of control in speech-focused spaces.
The most visually attractive wall is not always the most acoustically useful wall. The best overall result usually comes from balancing design intent with reflection control.
Can Acoustic Wall Panels Be Fitted On Ceilings?
Some acoustic wall panels can be fitted on ceilings, but ceiling installation requires secure fixing, safe handling, and a panel system suitable for overhead use. Ceiling applications usually need stronger mechanical support than standard wall installations.
Ceiling mounting introduces gravity and safety considerations that do not apply in the same way on vertical walls. Product suitability, fixing method, and load support should all be checked carefully before any overhead installation is attempted.
Can Acoustic Wall Panels Be Fitted Over Wallpaper?
Fitting acoustic wall panels over wallpaper is usually a higher-risk approach because the wallpaper bond can fail before the panel bond fails. Removing unstable wallpaper is generally the safer and more durable option.
Wallpaper is only as reliable as its existing bond to the wall. Heavier or long-term panel installations should not depend on a decorative layer that may already be ageing or partially loose.
What Is The Best Adhesive For Acoustic Wall Panels?
The best adhesive is a high-quality panel adhesive or grab adhesive that is compatible with both the wall surface and the panel backing. Adhesive choice should always match the substrate, panel weight, and manufacturer guidance.
Some adhesives perform well on sealed plaster and poorly on porous plasterboard. Others behave differently on felt backing. Compatibility matters more than brand familiarity.
Can Acoustic Wall Panels Be Fitted In Bathrooms Or Kitchens?
Acoustic wall panels can be used in some kitchens and low-moisture areas, but standard interior acoustic panels are not usually ideal for persistently humid or splash-prone environments. Moisture suitability should be checked before installation.
Steam, regular condensation, and direct water exposure can affect adhesive performance, substrate condition, and long-term panel durability.
How Many Acoustic Wall Panels Are Needed For One Wall?
The number of acoustic panels needed depends on the wall size, the panel size, the layout direction, and the waste allowance for cuts. Quantity planning should also include obstacle cut-outs and a small margin for fitting risk.
Ordering too tightly can delay the project if one panel is damaged or one cut goes wrong. Careful quantity planning is therefore part of the installation process, not just part of buying the materials.
Conclusion
Acoustic wall panel installation requires careful planning, accurate measuring, and the correct fixing method. A well-executed installation improves both appearance and sound quality, while poor preparation leads to visible and structural issues.
The most successful projects focus on preparation, layout, and precision rather than speed. Choosing the right installation method and understanding realistic acoustic performance ensures a better final result.
A simple installation can be completed successfully by a careful homeowner, while complex designs benefit from professional expertise. In all cases, attention to detail remains the key factor that defines the final quality.
